Asphalt Shingle Installation
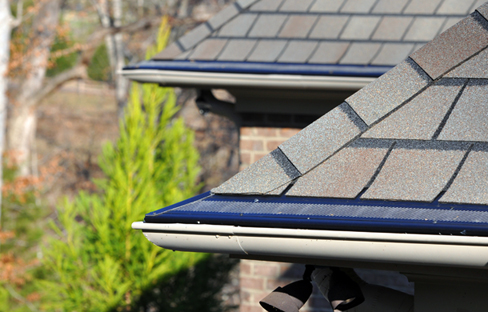
- After thoroughly cleaning all gutters and downspouts of debris, take the guard body and slide from right or left, fitting between starter and finish shingle until in desired position.
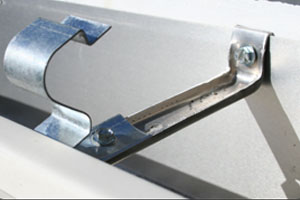
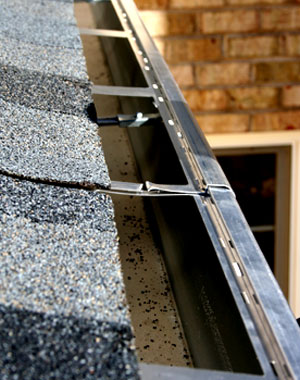
- Once guard body is in position, the guard brackets are tap-screwed to each gutter hanger through the bracket hole, attaching guard bracket with the rounded radial edge facing outwards. Ideally, leaving between one-quarter of an inch to one-eight of an inch of spacing between the radius of the guard and the top flat edge of the gutter, making sure bottom guard edge ends inside the gutter. The guard brackets are placed on top of existing hidden hangers and aligned to the front edge where gutter and hanger touch. The guard bracket has a turned edge so when screw is inserted and torqued, the bracket will not spin with the rotation of drill. Then notice guard bracket and guard body both have identical front radii, and will fit together with minimal pressure. Finally, crimp the 60° angled tabs on the tops of the guard brackets so they clamp the guard body place.
- When installing the next body section, repeat clip process, then allow ½” linear overlap section to section. Overlap should be snipped on upper piece so sections snap together. (Once finish out section can be measured, allow an additional ½” to measurement.)
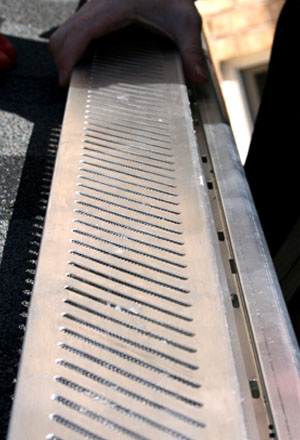
- When guard body is completely installed, place service tray with mesh facing down, staggered 4″ beyond body joing as installer deems necessary. Notice 90° ¼” bend bridge areas in guard body, that allow tray to sit flush with guard body. Apply tap screws every 16″ to 24″ linear through top and bottom eighth-inch edges through tray into bridge areas until snug. (Do not strip out holes. Set drill to low speed and gently snug up quarter inch hex head tap screws – included).
- Installation Tip: When screwing tray to guard body, (step 4) inserting a chisel between the radius and gutter to support the guard while pressing down with your drill to insert the tray screws prevents deforming the pre-adjusted guard brackets.
- When installing Phalanx Gutter Guard, it is always necessary to lower the existing gutter so that the Phalanx Guard and the roof pitch are as close as possible to achieve the maximum shed/deflection potential of the guard.
- It’s recommended that when cutting body on an angle, use a circular 10 inch chop saw with blade reversed, allow saw to reach maximum rpm before sawing through material (always wear safety glasses).
- For cutting tray, recommend sheet metal snips, cut with care as not to distort metal profile.
- Finally when section is complete, fabricate end cap to prevent birds and animals from entering the system.
Metal Roofing Installation
- Thoroughly clean all gutters and downspouts of debris.
- On a metal roof installation, the gutter guard cannot be installed underneath the metal roof panels. In order to work around this, a metal brake is necessary. With a tape measure, measure on an angle from the highest point of the drip edge to the front inside lip of the gutter. Take this measurement and pull from front radius of the gutter guard to the back of the gutter guard, mark this measurement as the brake-point for the back of the gutter guard. Insert the gutter guard into the metal brake upside down and bend a 98° angle. Gutter guard can then be installed under the 1.5″ roof projection against the drip edge and screwed every 16″ – 24″ directly into the drip edge.
- Follow steps 2 – 5 above.
Flat Roof Installation
- Thoroughly clean all gutters and downspouts of debris.
- Flat roofs typically do not have a shingle to tuck under. Once again, a metal brake will be necessary in order to install the Phalanx Gutter Guard system. Measure from the top-most edge of the drip edge to the front inside edge of the gutter. Subtract 3/4″ pull measurement from front radius of the guard to the back of the guard and mark this as the brake point. Place gutter guard in the metal brake top side up and brake anywhere from 22° – 35° angle. Tap screw 3/4″ bend directly into the drip edge. Seal heads of screws with roofing caulk. (Can also be attached under drip edge.)
- Follow steps 2 – 5 above.
Serviceability
Designing a guard that shields debris well: easy. Designing a guard that allows easy access to the interior for service: challenging. Enter guard through the top by removing the service port tray. Phalanx® has a 3.5″ removable tray arrayed with parallel diagonal 0.0125″ wide slots and an aluminum mesh bonded underneath between two 90 degree ¼” down turned edges. The length of each tray is 8′ and can be removed with a ¼” nut driver and drill. The tray can be screwed every 2′ or 3′ into ¼” bridge supports depending on roofing type. To service a section, set up a ladder to proper elevation. Have ¼” nut driver bit fitted in a cordless drill, and every 2′ to 3′ remove screws securing tray to body, then take nail or screw and pry up on tray. After removing screws, the tray will flex up for removal. When the tray is removed, the inside of the gutter will be accessible either by hand or with water hose. The debris will be very small but finer micro debris can be best removed with a small 3″ x 5″ flat aluminum coil stock scooper, which can be made from any scrap.
Warranty
Phalanx® Gutter Guard (PGG) warrants that the product sold to the Purchaser, if properly used and installed, for a period of 20 years from the date of purchase, will be free from material defects. This limited warranty does not cover damages resulting from the improper handling or improper storage or improper installation of the product by the Purchaser, its contractor, employees, installer(s), agents or representatives. The term “Purchaser” as used herein includes any end user of the product.
The Purchaser acknowledges that it has made the selection of the products based on its own judgment.
PGG, at its election, shall within a reasonable time either (1) replace the defective product from its inventory, if available; (2) repair the defective product; or (3) allow a credit for the amount of the purchase price of that portion of the product which is defective.
This limited warranty is the Purchaser’s exclusive remedy. Except as herein provided, PGG shall not be liable to the Purchaser in any manner with respect to the product. In no event shall PGG’s liability to the Purchaser ever exceed the total purchase price of the allegedly defective product.
No implied warranties of any type, whether of merchantability, fitness for a particular use or otherwise shall apply to product purchased from PGG by the purchaser, and PGG shall not be liable to the purchaser, in any event, for consequential, incidental, punitive or special damages, including, without limitation, lost profits, whether arising from the sale of product, any defect in the product, any use of the product, or the purchaser’s inability to use the product, or otherwise. The foregoing limited warranty is given by PGG in lieu of all other warranties, express or implied.


